Sander Schutten
Tuesday, December 11, 2018
Connect to Azure AD secured SignalR Hub from your SPFx code
SignalR is a great technology to provide users with real-time UI updates of events happening in the back-end. It’s a perfect match with SPFX to build some amazing web parts for SharePoint. With the recent release of ASPNET SignalR Core (now incorporated in the ASP.NET Core GitHub project) SignalR is easier to use than before. So you’ve gone and created a web part that connects to a SignalR hub and the experience makes a real impact for your users. But how do you ensure only allowed people can connect to the SignalR hub? That’s what this blog post will get into.
This blog post covers the following scenario: you have an SPFX that connects to a SignalR hub and you want to authorize people to the hub using Azure Active Directory. I’ve had a lot of help from Sergei Sergeev’s post [Call Azure AD secured API from your SPFx code. Story #2: Web app (or Azure Function) and SPFx with adal.js](http://spblog.net/post/2018/07/29/Call-Azure-AD-secured-API-from-your-SPFx-code-Story-2-Web-app-(or-Azure-Function). Go visit his blog, it’s full of relevant details.
We’ll be using SPFX framework version 1.6 and ASP.NET SignalR Core. Setting up authentication to flow from SharePoint to the SignalR hub breaks down into the following steps:
- Add new app registration in Azure AD
- Enable authentication in the SignalR hub
- Modify web part to connect to SignalR hub using obtained token
- Allow SharePoint user impersonation
1. Add new app registration in Azure AD
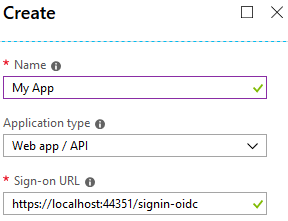
This step is similar to the step outlined in Sergei’s blog, but I’ll repeat it here for sake of completeness. In Azure Portal, click Azure Active Directory -> App Registrations. Create a new application registration of type Web app/API and give it a name. Since the sign-on URL won’t be used you can pick anything. Let’s use https://localhost:44351/signin-oidc for now:
Copy the Application ID from the properties. We need it in the next step. You should also copy your Tenant ID. You can find your Tenant Id in the properties section of the Azure Active Directory pane in the Azure Portal. It’s called Directory ID.
2. Enable authentication in the SignalR hub
To enable Azure AD authentication we first need to add the NuGet package Microsoft.AspNetCore.Authentication.AzureAD.UI to the ASP.NET Core project that hosts the SignalR hub. At this time of writing the lastest stable version is 2.1.1.
Once the NuGet package is added, we enable authentication by making a few modifications to the code.
We need to set up the configuration of the service principal that we created in the previous step. During development we use the Secrets Manager tool to prevent our secrets ending up in version control. The Secret Manager tool stores sensitive data during the development of an ASP.NET Core project. App secrets are stored in a separate location from the project tree. The ASP.NET Core Configuration API provides access to Secret Manager secrets. Therefor we don’t need to do anything special to access the secrets stored using the Secret Manager.
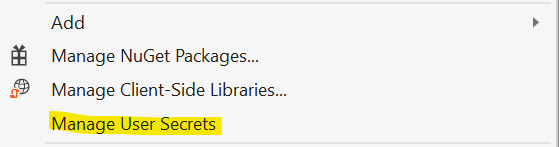
Right click the ASP.NET project and choose ‘Manage User Secrets’. Visual Studio will create a secrets.json file for you and associates it with your project.
Add the following configuration section to the secrets.json using the values you copied in the previous step.
{
  "AzureAd": {
    "Instance": "https://login.microsoftonline.com/",
    "TenantId": "<your Tenant ID>",
    "ClientId": "<the App ID>",
    "CallbackPath": "/signin-oidc"
  }
}
Add a constructor to the Startup class that takes in the IConfiguration dependency and stores it in a local field. This allows us to easily access the configuration in later lifecycle methods. See the following snippet for details. The snippet also shows you how to get other properties through dependency injection like IHostingEnvironment and ILoggerFactory.
public class Startup
{
    private readonly IConfiguration _config;
    // ...

    public Startup(IHostingEnvironment env,
        IConfiguration config,
        ILoggerFactory loggerFactory)
    {
        _config = config;
        // ...
    }

    // ...
}
Next add a call to the AddAuthentication extension method on the IServiceCollection in the ConfigureServices lifecycle method of the Startup class. We configure it to use the default Bearer authentication scheme. We furthermore enable Cookie authentication and provide the config for the Azure AD Bearer authentication. The Bind(...) method takes the config from the AzureAd section and attempts to map it to the AzureAdOptions class.
public void ConfigureServices(IServiceCollection services)
{
    // ...

    services.AddAuthentication(AzureADDefaults.BearerAuthenticationScheme)
        .AddCookie()
        .AddAzureADBearer(options => _config.Bind("AzureAd", options));
}
Add a call to the UseAuthentication extension method on the IApplicationBuilder in the Configure lifecycle method of the Startup class. This tells ASP.NET Core to actually use the authentication that we’ve configured in the ConfigureServices method. Make sure to call the UseAuthentication method before the call to UseSignalR as it can give unexpected results if you add it after.
public void Configure(IApplicationBuilder app, IHostingEnvironment env)
{
    app.UseAuthentication();

    app.UseAzureSignalR(routes =>
    {
        routes.MapHub<MyHub>("/myHub");
    });
}
Finally we tell the hub that we require authenticated users by adding the Authorize attribute to the hub class, as demonstrated in the following snippet.
[Authorize]
public class MyHub : Hub
{
    // ...
}
Allright, we’ve now set up our hub! Test it out and discover that your web part can no longer connect to the SignalR hub because it must be authenticated. So far so good. Now lets fix the web part.
3. Modify web part to connect to SignalR hub using obtained token
In order to be able to obtain a token to authorize to the SignalR hub with, we must declare the user_impersonate permission in the package-solution.json file. This permission allows the SharePoint Online Client Extensibility service principal to call web api’s as the logged in user. Open the file and add the webApiPermissionRequests element. Use the App ID (or full name of the app registration) as value for the resource.
{
  "$schema": "https://developer.microsoft.com/json-schemas/spfx-build/package-solution.schema.json",
  "solution": {
    ...
    "webApiPermissionRequests": [
      {
        "resource": "<App ID>",
        "scope": "user_impersonation"
      }
    ]
  },
  ...
}
To authenticate with the SignalR hub we need to send a bearer token when connecting. This means we need to obtain a token and telling SignalR to use that token. Usually we would use the new AadHttpClient to call an API, as this would hide all the ADAL plumbing we need to do to get a token and call the API with the token. Unfortunately we can’t use the AadHttpClient with SignalR because it doesn’t implement the full HttpClient stack. Fortunately the AadHttpClient uses the AadTokenProvider that’s available to us. We will use the token provider to obtain the token and it will do all the magic for us.
To get the AadTokenProvider we must ask the AadTokenProviderFactory to give us one. The AadTokenProviderFactory is available through the WebPartContext of the BaseClientSideWebPart class. In my case I send the AadTokenProviderFactory as a prop to my React component that does the actual visualization, like this:
export default class MySampleWebPart extends BaseClientSideWebPart<IMySampleWebPartProps> {

  public render(): void {
    const element: React.ReactElement<IMySampleProps> = React.createElement(
      MySample,
      {
        aadTokenProviderFactory: this.context.aadTokenProviderFactory
      }
    );

    ReactDom.render(element, this.domElement);
  }

  // ...
}
In the React component, add a method to get the token. Later we’ll tell the SignalR connection to use this method to get the authorization token. First we get the token provider and then we use the token provider to give us a token for our SignalR hub. The resourceEndpoint parameter should be the URL to your hub.
Note that in my sample I use
async/awaitto handle Promises as this is much easier to read. I would suggest you start usingasync/awaittoo, but if you like you can use plain Promises instead.
private async getAccessToken() {
  var tokenProvider = await this.props.aadTokenProviderFactory.getTokenProvider();
  return await tokenProvider.getToken("<Hub Endpoint>");
}
As I mentioned a little earlier we now need to tell the SignalR connection to use this method to obtain the tokens. The withUrl method of the HubConnectionBuilder allows us to specify the IHttpConnectionOptions. One of the options is the accessTokenFactory. We set the assetTokenFactory to be our getAccessToken method, like in the following snippet.
this.connection = new signalR.HubConnectionBuilder()
      .withUrl(url, { accessTokenFactory = this.getAccessToken })
      .build();
4. Allow SharePoint user impersonation
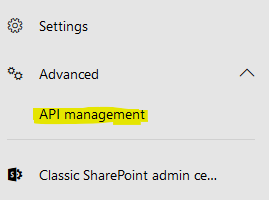
OK, awesome, we’re done with modifying our web part code. We’re almost there, but before we can actually test our web part we need to approve the user_impersonation permission we declared in our web part. We need to do this in the SharePoint tenant where we want to use or test this web part. You can do this using Powershell, but I’ll save that for another post. For now we’re going to use the SharePoint admin center.
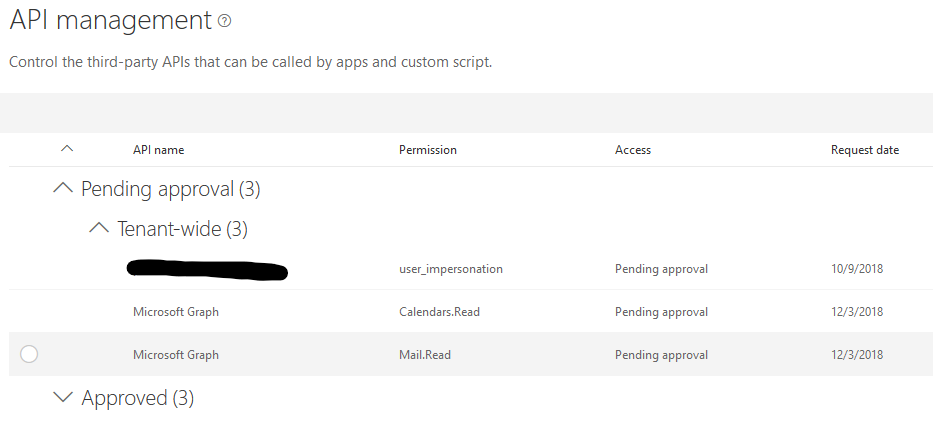
Package up your web part and upload the sppkg to the SharePoint app catalog as you’d normally do. By uploading the sppkg to the app catalog, SharePoint will discover the declared permissions in your package.solution.json. Once you’ve uploaded your package to the app catalog move to your SharePoint admin center (usually https://
This will list you all the permissions pending approval. You should be able to find the user_impersonation permission as requested by your web part. Approve the permission.
That’s it! You’re now able to test your web part and this time it should be able to connect to your SignalR hub using authentication.
Note that once you enable authentication you must always test your web part in the hosted workbench. The reason for this is perhaps obvious: in order to obtain a token and authenticate to the SignalR hub you must be logged in with a valid Office 365 account.